Just a few…

Here are a few projects that I have worked on over the past year.  I’ve refinished lots and lots of tables, a few chairs and more to come!

First off, I kept this one.  Simple redo with Casement Fusion Mineral Paint and just sanded the top, kept it as is.  Beautiful!

side table 1

IMG_1086

IMG_1079

Side table refreshed with Heirloom Fusion Mineral Paint and Dark walnut stain.

side table 3

IMG_1094

End table refreshed with Mountain Haze Fat Paint and ebony stain.

side table 2

IMG_1126

Coffee table refreshed with Natural Grey Behr paint.

2017-07-19 12.38.51

IMG_1243a

Coffee table refreshed with Inglenook Fusion Mineral Paint.

DSC_8650

IMG_1247a

Old school side table refreshed and painted with Paris Grey ASCP and Heirlook interior.

_20170908_175640

IMG_1266a

IMG_1272

End table painted with French Linen ASCP and white wax on top. Love this look!

IMG_1277

IMG_1335

IMG_1336

End table painted with Paris Grey.

IMG_1289

2018-03-29 15.36.59

Half moon side table painted with a grey mix with Ash & Casement Fusion Mineral Paint.

demi moon table 1

demi moon table 2

ikea grey 1

ikea grey 2

Coffee table painted with a grey custom mix, and white wax on the top.

2017-06-12 15.37.36

IMG_1063

IMG_1068a

Coffee table turned bench, painted with Casement and a striped fabric.

2015-10-17 19.41.34

IMG_1347

IMG_1350

Coffee table, refreshed with Little Lamb Fusion Mineral Paint.

IMG_1280

IMG_1413

IMG_1411

Bye bye bunny

In the fall, I worked on 3 pieces for a client.  Two side tables and a pine chest.

One end table would be painted Paris Grey, the other Paloma, both ASCP.  Originally she wanted the table tops to be refinished and stained but the wood  was not great for refinishing.  The tables had great character and would look beautiful painted and updated.  I just simply painted the tables and sealed with Varathane with a satin finish.  And replaced the knobs.

The pine chest looked like it would be an easy redo….but those darn bunnies threw me off!  I sanded down the top and got rid of the tole painted bunny.  There was a clear outline left underneath.  I was skeptical and nervous that stain wouldn’t cover it up.

I used wood conditioner and let it soak for a over 15 minutes.  Then applied two coats of Provincial stain, allowing the first coat to soak in for 15 minutes at least.  My client didn’t want the top to be stained too dark, so the second coat i only left on for less than 10 minutes.  Luckily, after just one coat of stain, the bunny was barely there!  Now after staining and varathane, it’s totally transformed.  The base of the chest was painted in French Linen ASCP.  Love that colour.  Especially with a stained wood top.  Beautiful!

I love all of the finished pieces.   What a difference a little paint makes. Hoping to post more projects I’ve worked on so far this winter.   So stayed tuned in the next couple of days! 
Laurena 

Refreshed set of tables

I recently was asked to redo a set of tables, a coffee table and two side tables.  A fellow furniture refinisher had passed along my name to one of her clients and I am grateful for that!  I knew the tables would be a fun project.  I just loved the shape and details on the legs.  They definitely had potential to be pretty again!

m

g

 I was a little bit nervous whether the wood top on the coffee table could be refinished.  But I sanded the top down, the wood grain was beautiful!

image

After one coat of paint on the base and the coffee table was starting to shape up!   The raw wood looked nice with the painted base.  Since the plan was to stain the wood, I was inspired to search for a piece of furniture that I could redo in the future and leave the top bare wood.  That style is beachy and fresh.  And something I haven’t done yet.  I just love the look!

image

Anyway, back to the coffee table… on this table the wood grain wasn’t shining without stain, so I was excited to see how it would look once stained.  After a coat of Provincial, it looked pretty good!  I just love that wood grain.

image

image

Even the side tables were looking better with just one coat of Old white!

 Love all the curves!

image

I did a couple coats of Provincial minwax stain on the coffee table top, leaving the stain on for 20 mins each time.   I painted a few coats of Old White ASCP on the table base and end tables.

I love the look of white furniture, but painting them white is a little painful.  No matter how light the wood is, it seems there’s always a little peaking through the paint.  I made sure to do 3 coats of paint and a touch up coat.  I also had some bleed through on the coffee table, but I used Shellac on those spots and painted over with the Old White.   Shellac works like a charm!

After lightly sanding the chalk paint so it was smooth like buttah and antiique the edges, I applied a coat of wax.  On the wood top I did 3 coats of Varathane in satin finish to make sure it was durable.

Here’s the sneak peak after the two coats of stain and paint.  It’s amazing how the curves were highlighted!  Loved it already.

y

And here are the tables in their home!  I just love how they turned out.  And even better, the client was pretty happy with them!

r

d

t

The tables were a lot of work but its worth it for me to make someone happy with their home.  That’s one big part of furniture refinishing that I love!

I’m taking a break this week, but hoping to tackle a couple desks next week.

Laurena 🙂

Painting with the essentials.

As a self-taught furniture refinisher, I’m always trying to improve  my work.  There are plenty of great tools and products out there to make things go more smoothly.  Finding the right ones among the millions of options is the hard part!

Over time, I’ve discovered spending a little extra on better quality products is worth it.   I bought a really great sander that makes prep work a wee bit painless. There are a few paint lines that I love and are easier to work with, AS chalk paint, Fusion Mineral Paint, MMS milk paint and General Finishes milk paint.    Latex is good too, lots of colour options, but using paint designed for use on furniture (like those listed above) is my first choice.  Using good paint makes prep work almost non-existent and the paint goes on easier.

paint

In the past, I’ve just bought cheap paint brushes, cleaned them until they were yucky and falling apart, then tossed them in the trash.  Over time the $$ add up!   My thought process was, I had good quality paint, the brush doesn’t matter….but I was wrong!

Last week I bought a good quality brush at my local ASCP retailer, Rusty Hinges.  I tried it out the next day and had a “where have you been all my life!” moment.  The paint brush made the paint go on better, into all the nooks and crannies.  And I used less paint.  Love this brush!

pure_bristle

So I learned something new this week.  Buy good paint brushes!  It’s worth it in the end.  I probably won’t use as much paint and it will be faster to paint a piece of furniture.  Win, win!

Have you learned any tips and tricks this week?  Share away!  Would love to hear from you.

Thanks for stopping in!

Laurena

French Linen dining table

Another hand-me-down piece, this time a dining table.  I had this table for awhile and wanted to refinish the top, but never had the chance to sand it.

It’s a basic dining table from the ’70s, great wood, turned legs.

image

Once sanded, the top looked like new!

image

I used Provincial stain (the same as the commode and coffee table).  Of course, on all pieces I used wood conditioner first.  It helps the stain absorb into the wood evenly and prevents blotchiness.

image

I chose to paint the legs and apron French Linen ASCP.  Love that colour.  A beautiful warm grey.  I loved the colour when I used it on a console table I had redone in the fall.  Slight distressing to highlight the shape of the legs and satin finish on the whole piece.

IMG_0862IMG_0860IMG_0861IMG_0878IMG_0870IMG_0880IMG_0879

l love refinishing wood tops. The beauty of wood grain makes me happy!  Especially after an update.  This table is one of my favourites.

I’ll be back with one more redo.  I guess I’m making up for some lost time!

Laurena

Duck egg blue, dresser redo

This is the second dresser that I received from my  friend’s parents.   I did the other one in snow white milk paint (see post here).

dressers before 2.JPG

I wanted to refinish this one a little differently. For the white dresser, I had used Polyshades on the top.  The second dresser, I was able to sand the top and restain it.  I chose to use a mix of Jacobean and Provincial from Minwax.

image

It took on a dark reddish colour.  At first I was nervous what it would look like with the base colour.  I was using Duck Egg Blue, ASCP, which is a nice grey blue.  I wasn’t sure how it would look with the reddish tone dresser top.  But once I started painting, my doubts fell away.  It looked beautiful.

2016-04-19 13.25.05.jpg

I had taken the old wood knobs off and drilled new holes for some new glass knobs.  Two coats of chalk paint, slight distressing and a couple coats of satin Varathane on the whole piece.   With the Duck Egg Blue, the clear knobs, the dresser is refreshed!

IMG_0819IMG_0821IMG_0820IMG_0827IMG_0831IMG_0833

And the dresser is happy in its new home!

I’ve finished a few other projects and will post those soon.  So what project shall I start next?  I do have a few chairs to reupholster and paint.  I’m itching to get some of them finished!

Laurena

Finally, I found THE one! Antique commode redo

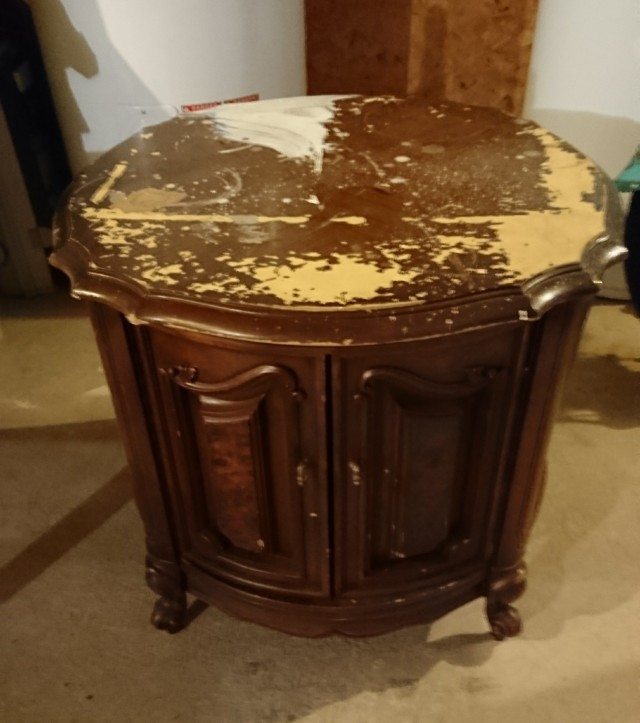
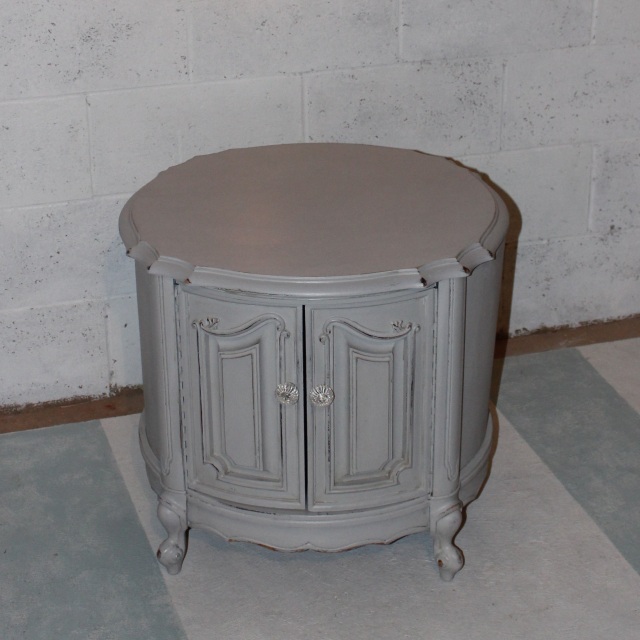
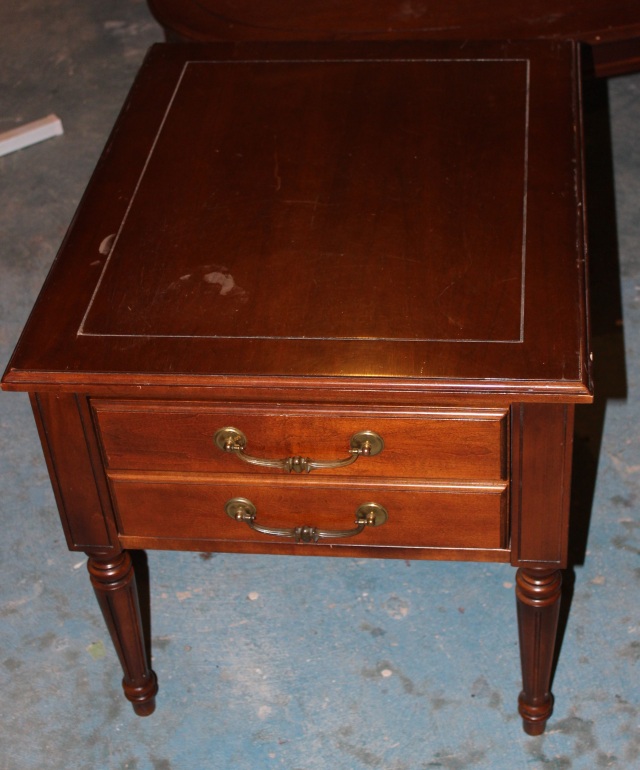
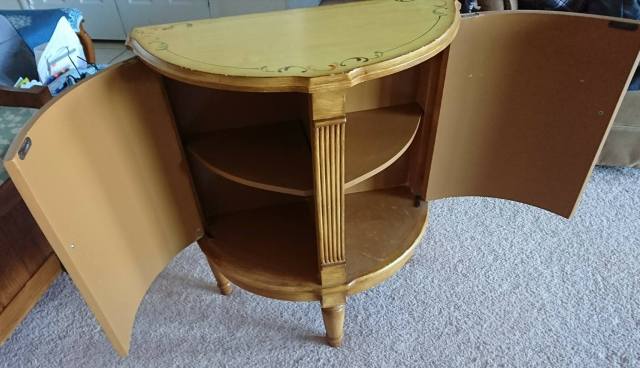
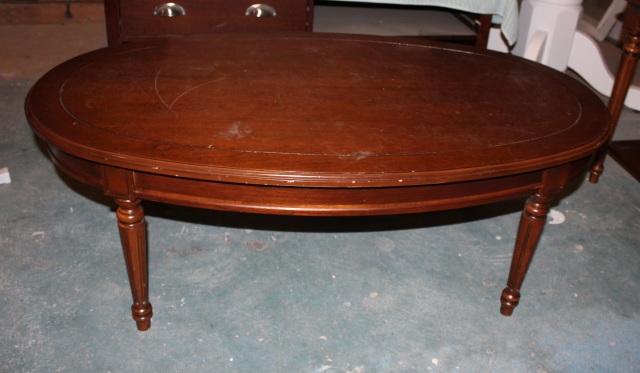
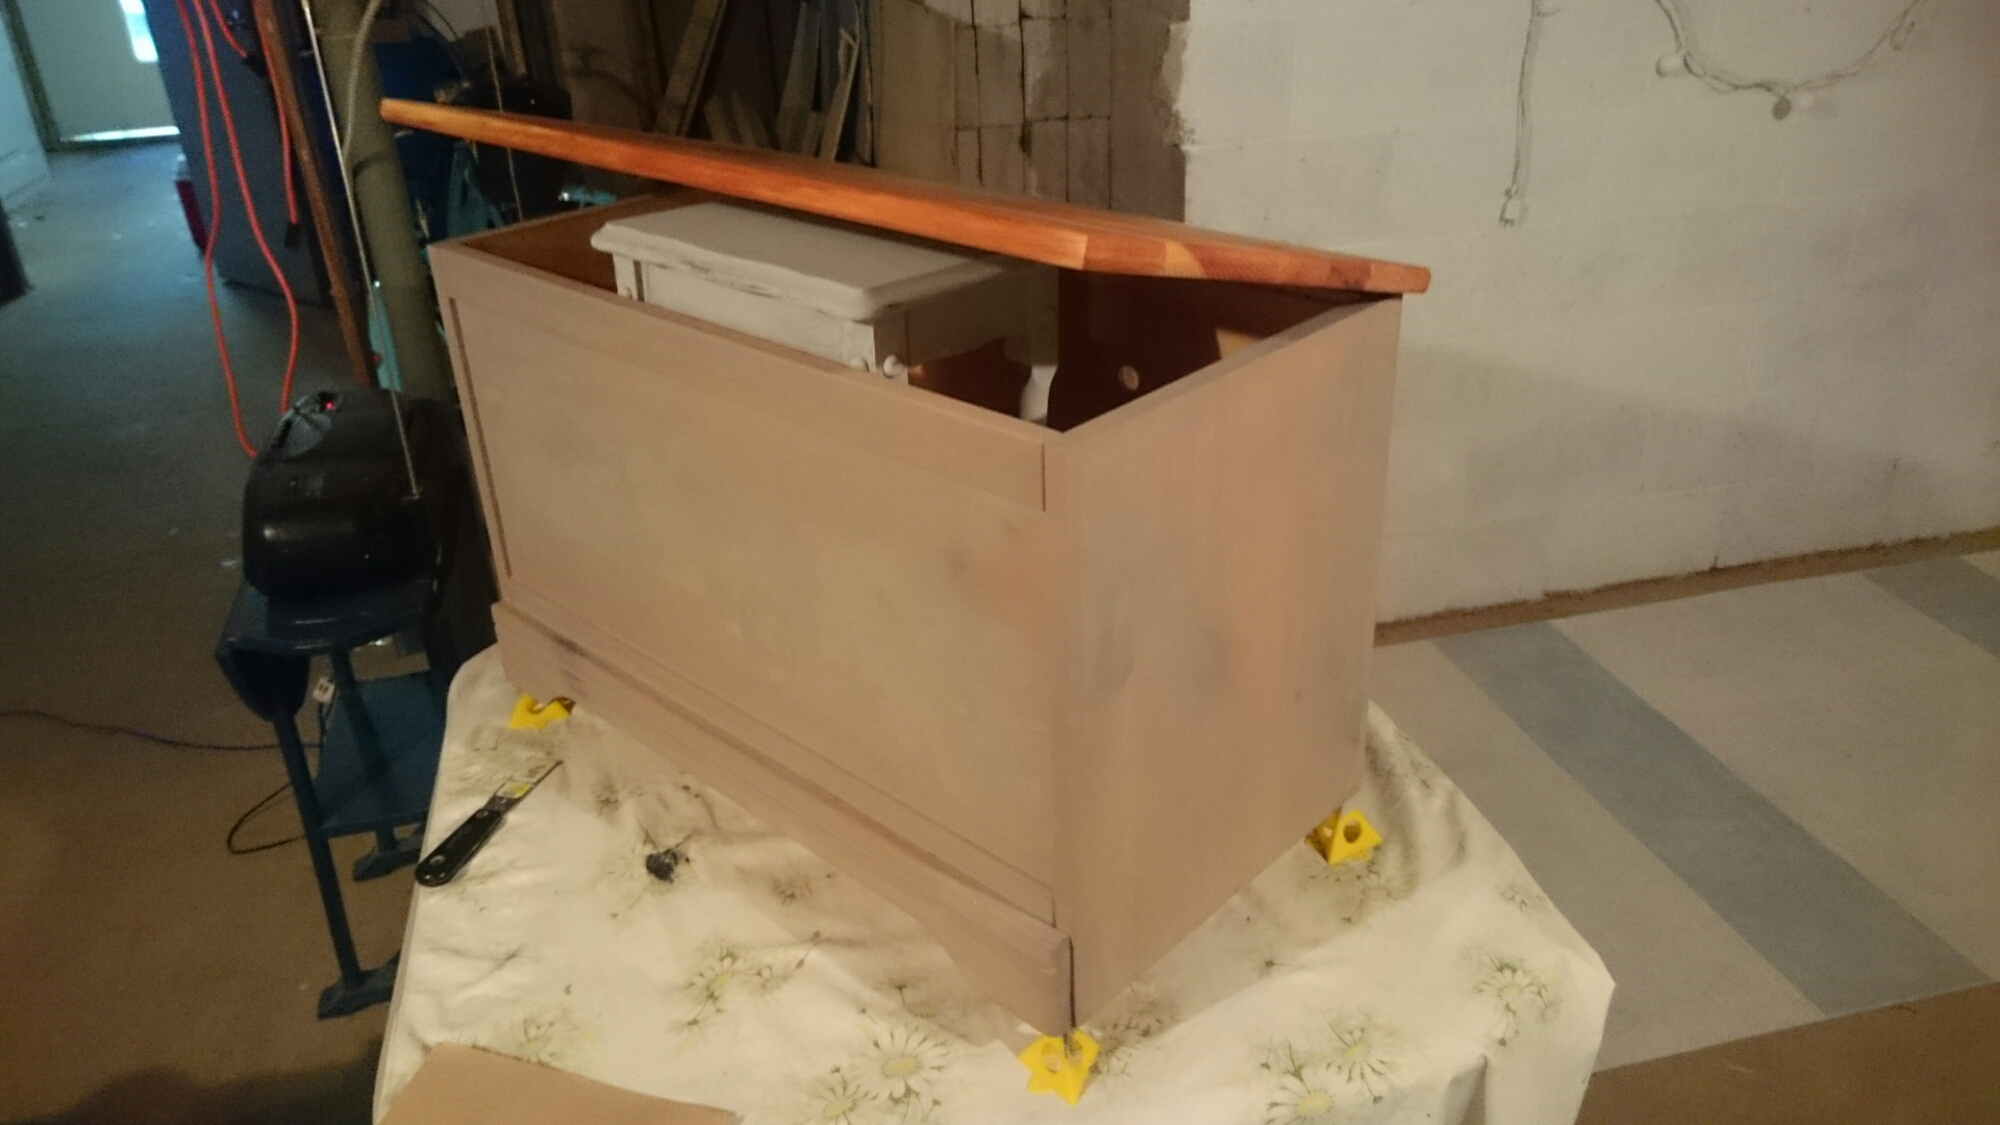
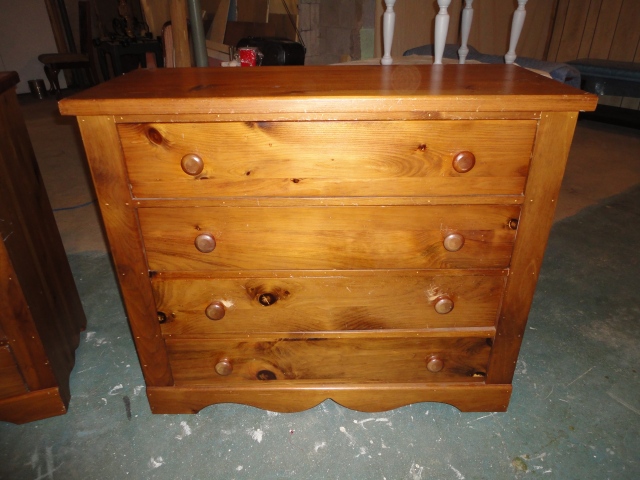
I’ve been searching for an antique commode for a lonnnnnggg time.  My grandmother had a couple in her home and I loved the cute little cabinets.  I’ve searched kijiji, antique stores, roadside freebies, yard sales…everywhere.   Most were either too much work (covered in old paint, falling apart) or over priced (more than $100).    A couple weeks ago,  I finally found one on kijiji. Great price and in good shape.  Sign me up!  I didn’t bother bartering and gave full asking, $60.  Since I was refinishing it for myself, it was a great deal.
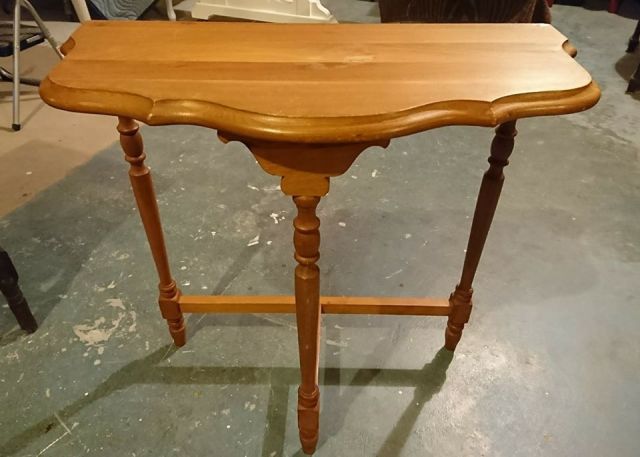
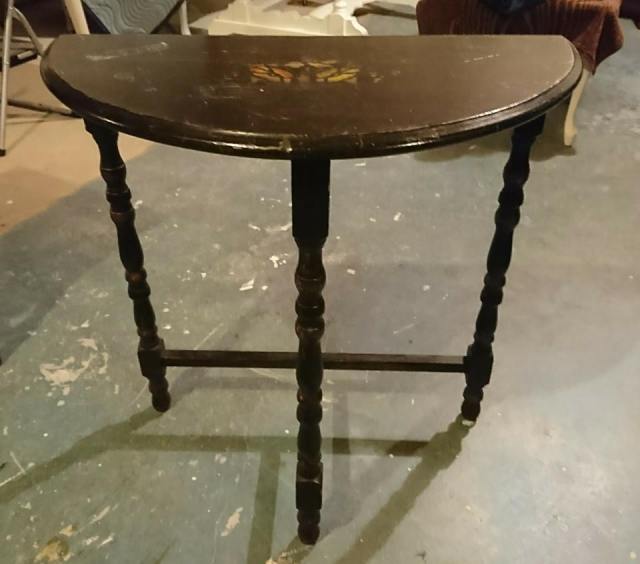
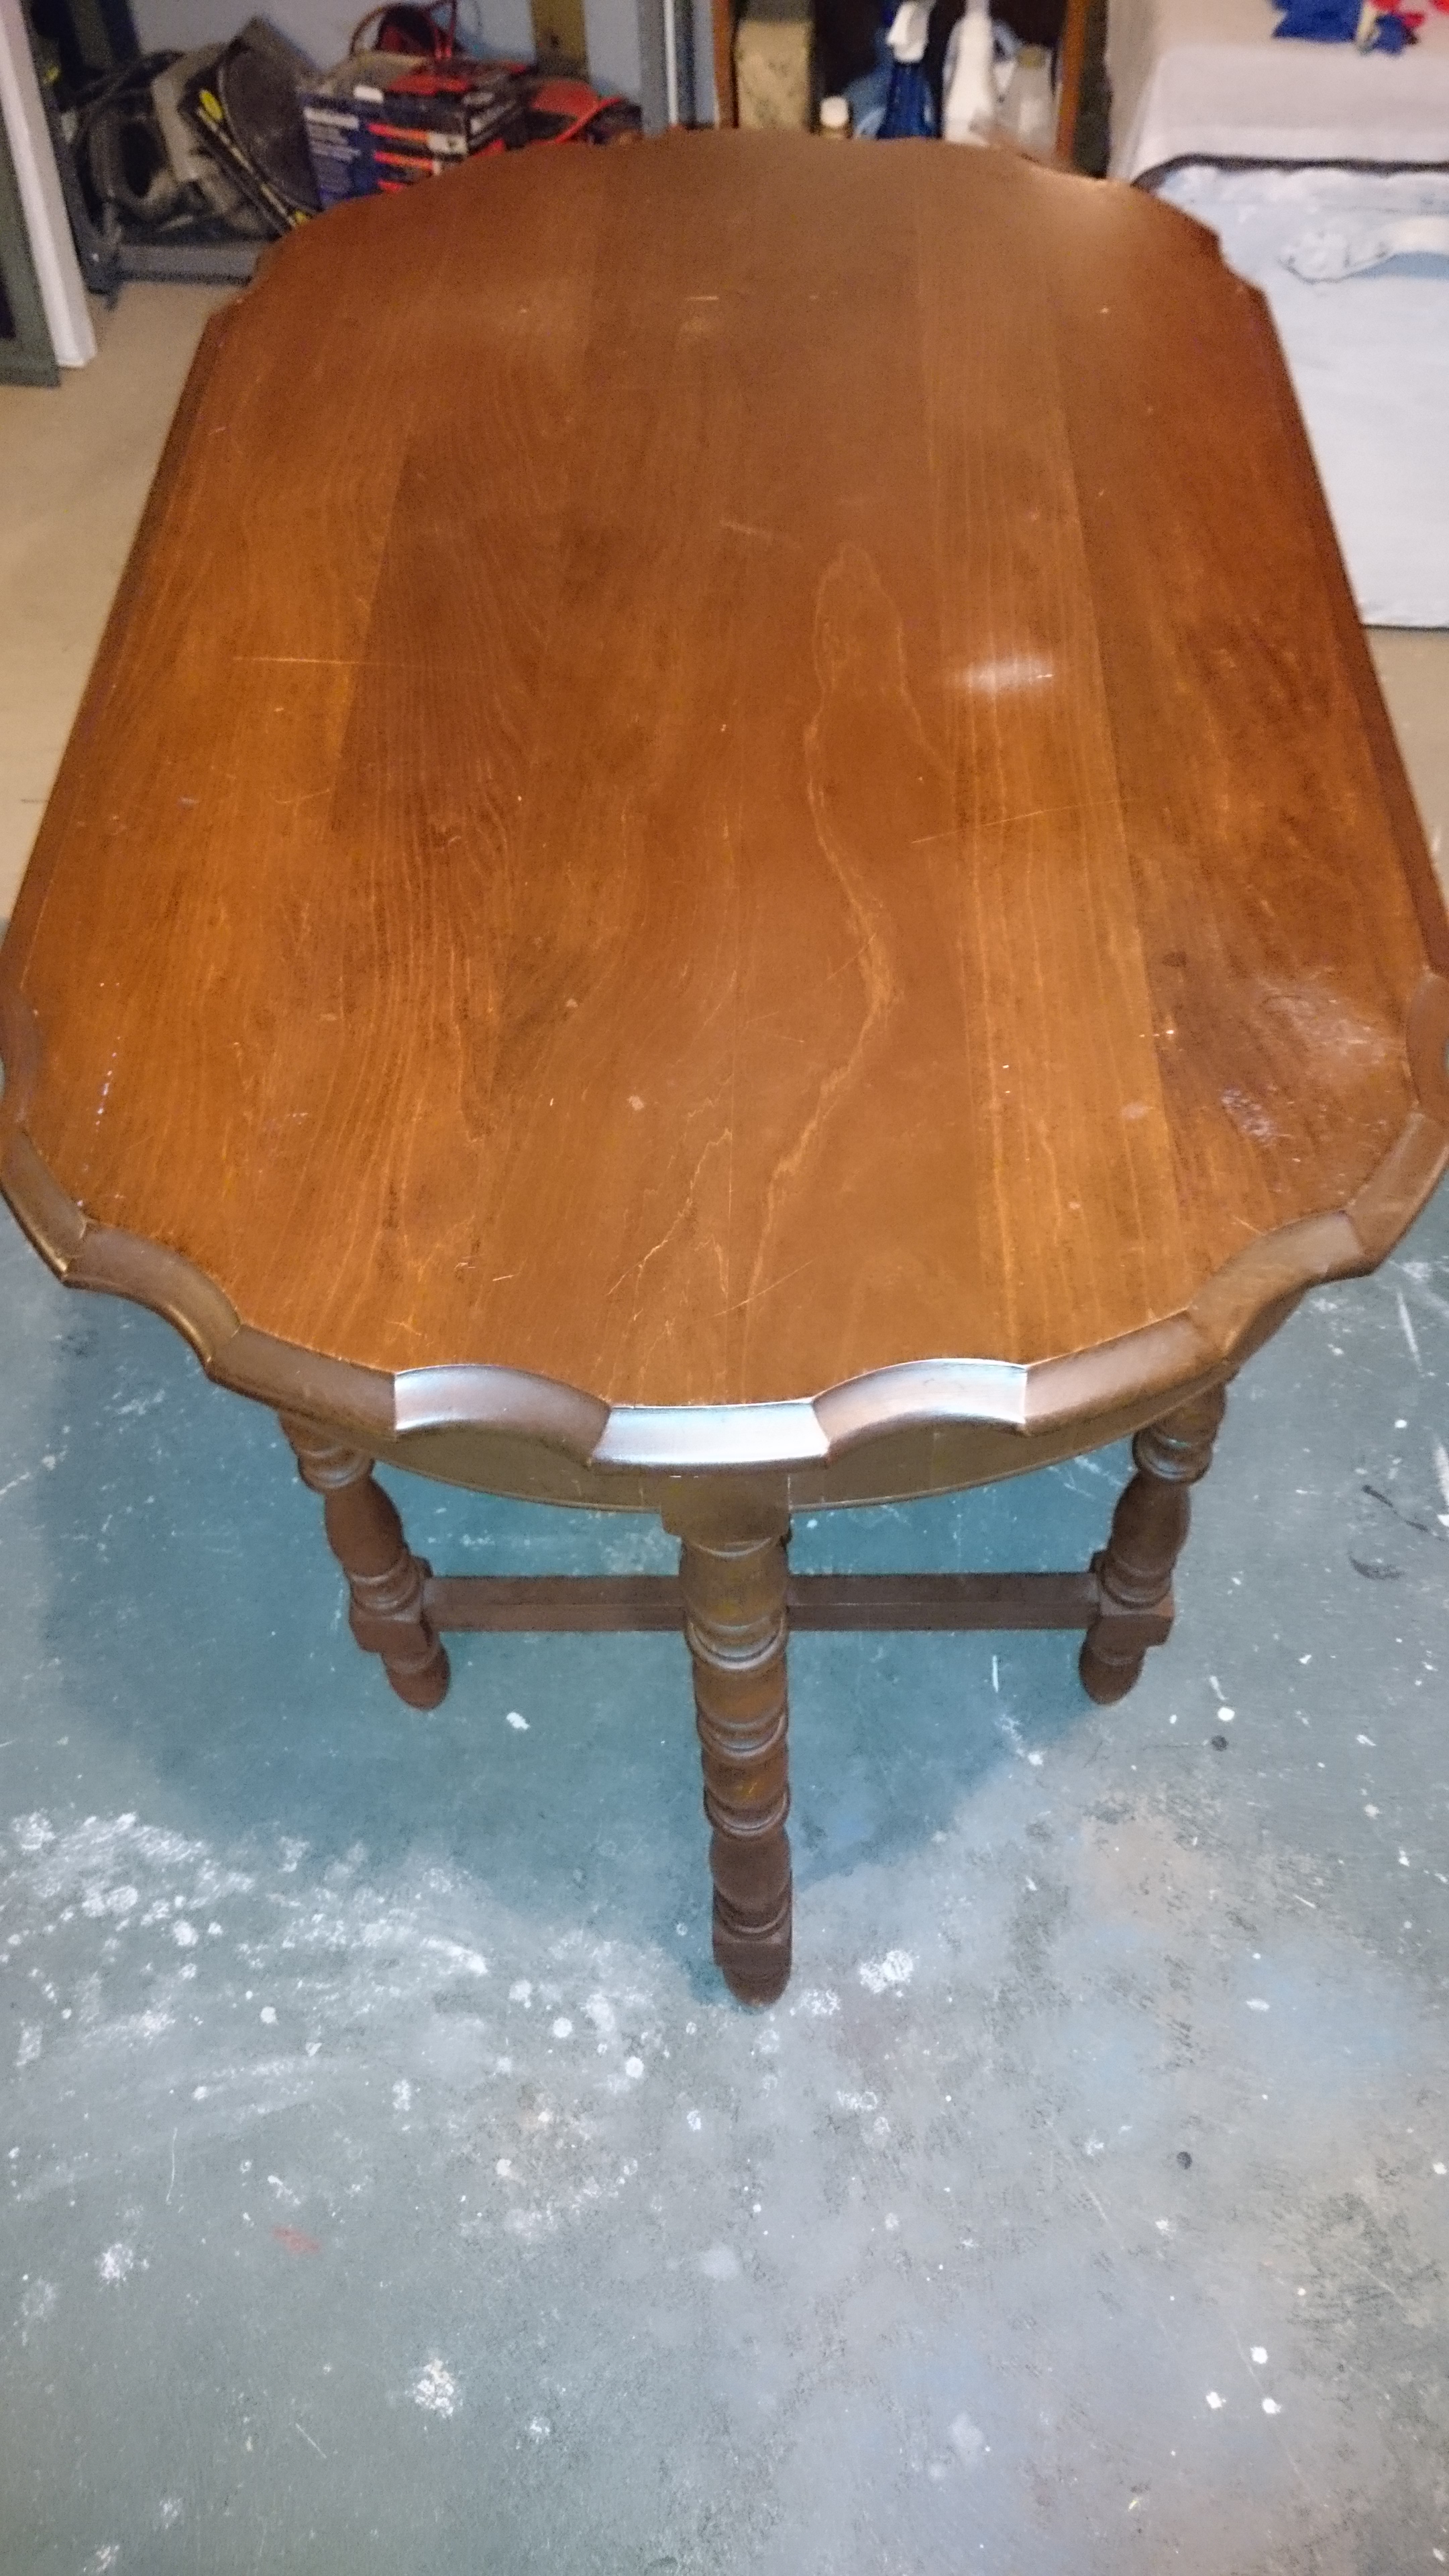
Here’s the before…

image

image

image

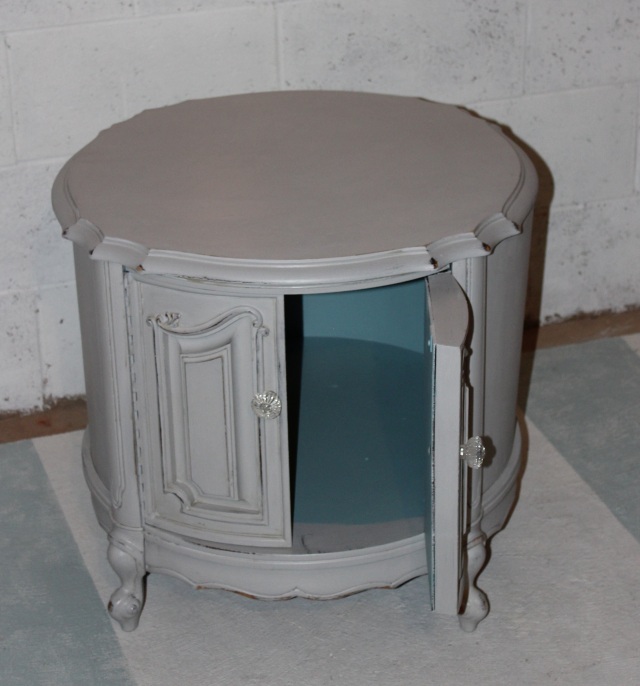
There wasn’t much work to be done structure wise.  The door wasn’t attached but the hardware was included.  I would have had to take the door off to paint the base, so it worked out.

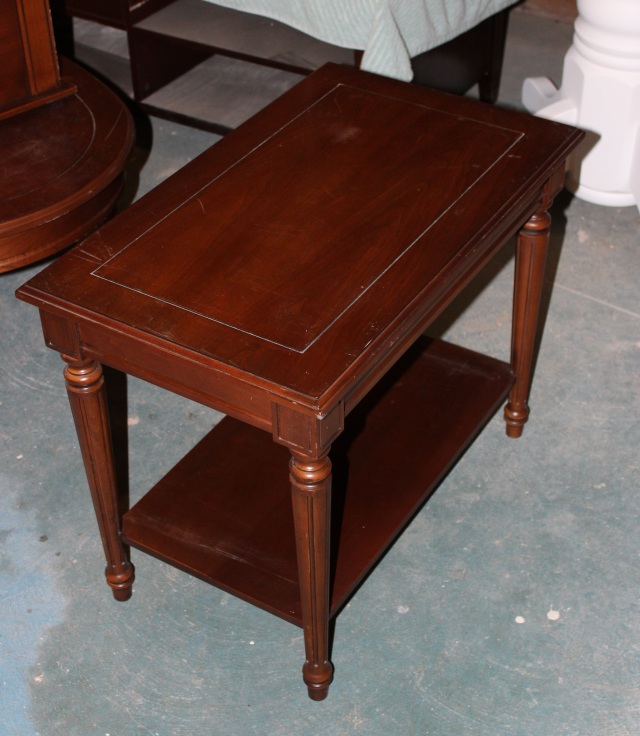
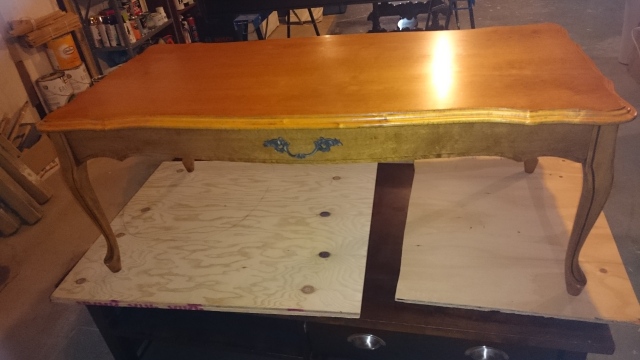
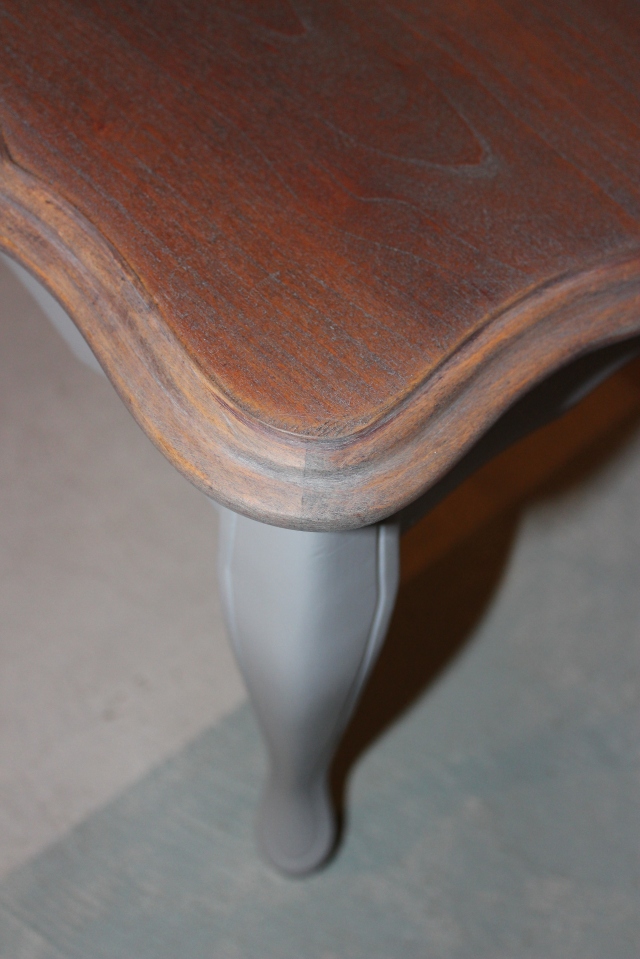
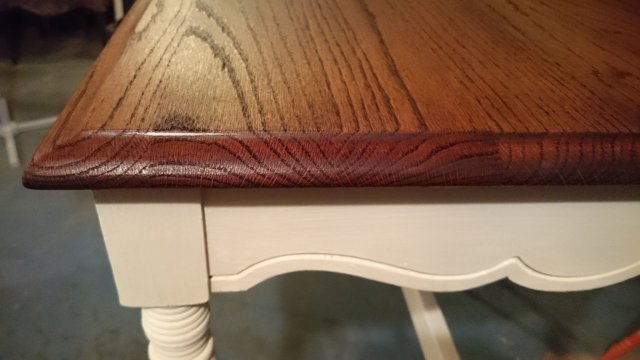
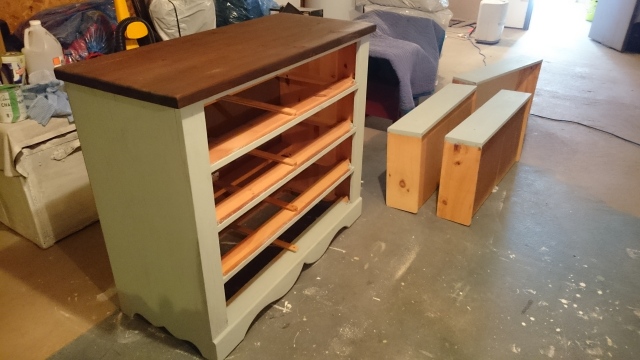
I wanted to do a two-toned look; painted base, wood top.  So I started by sanding down the top.  Its always a crap-shoot refinishing an old piece of furniture.  You don’t know what the wood grain looks like underneath or if there are stains in the wood.  But imperfections in wood add character!  So I try to work with what I uncover.

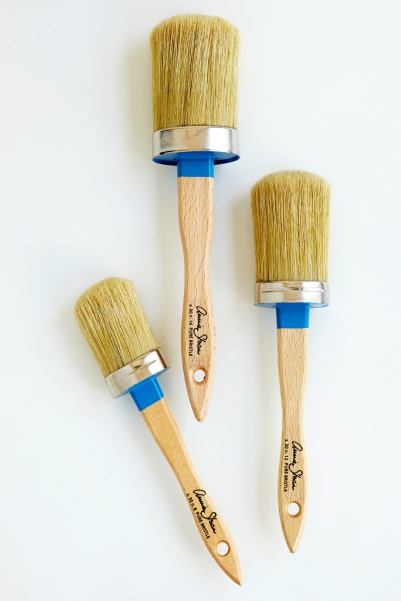
Side note:  I dislike the sanding part.  Recently, I bought a new sander…and it was a great purchase!  It has made sanding so much easier.  The hard-cased dust collector is my favourite feature.  I’ve had a couple of sanders with cloth bags and they always get a hole in them.  Dust everywhere.  This time, sanding was quick and painless and there was only a little bit of dust clean up.  I definitely recommend the Bosch!

image

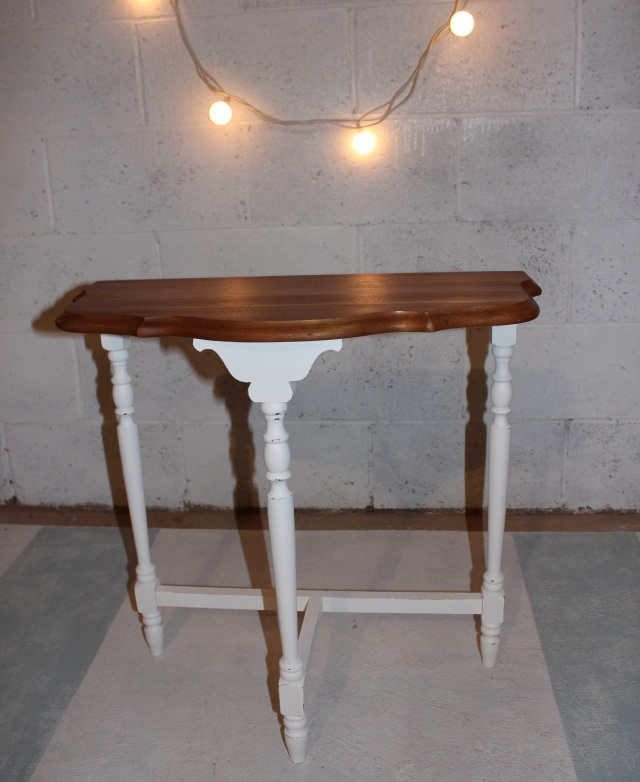
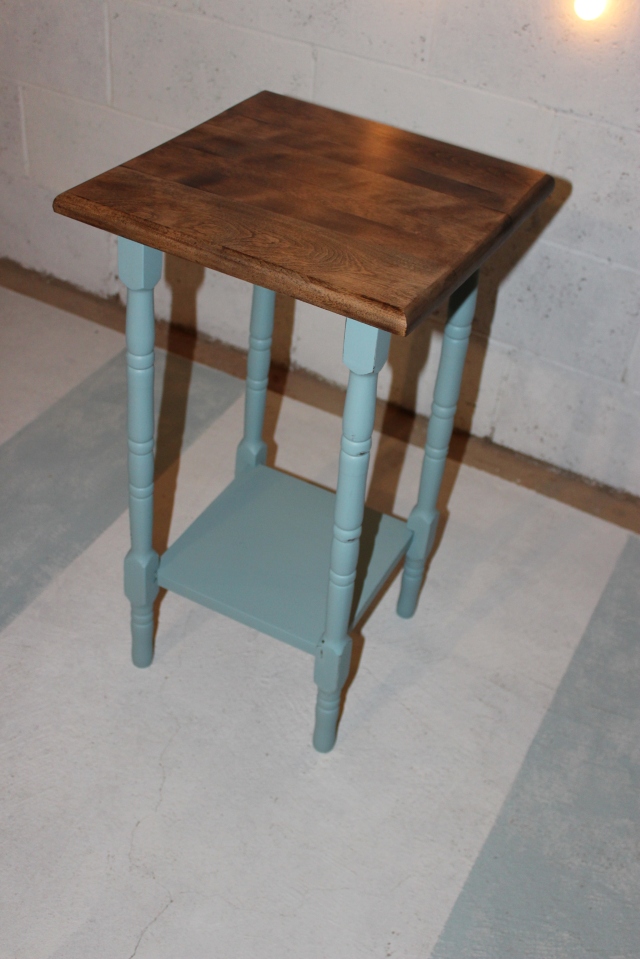
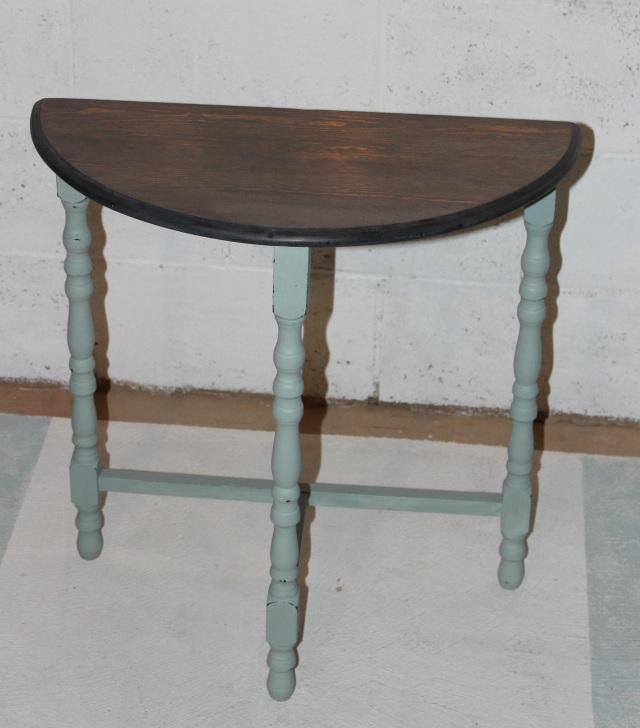
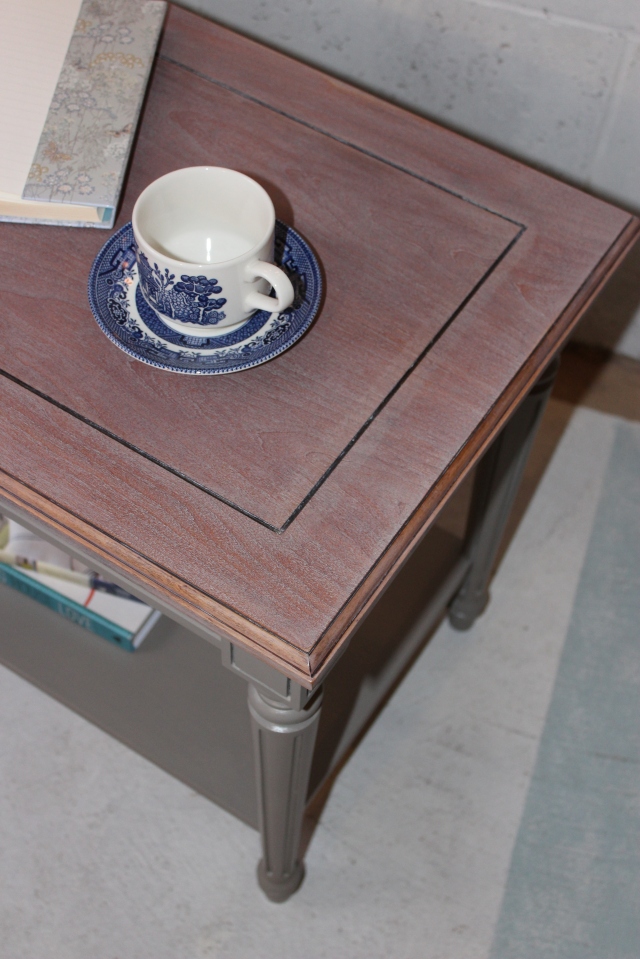
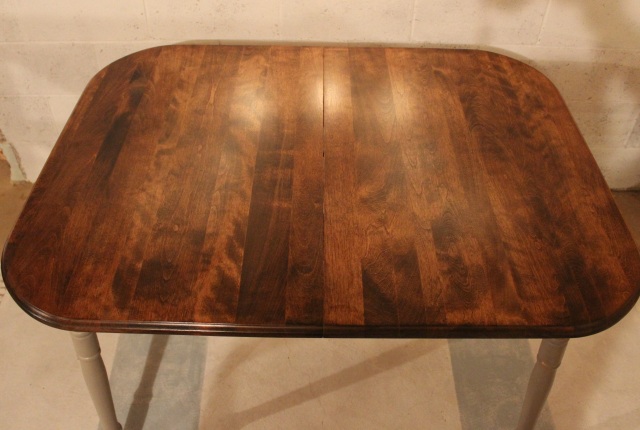
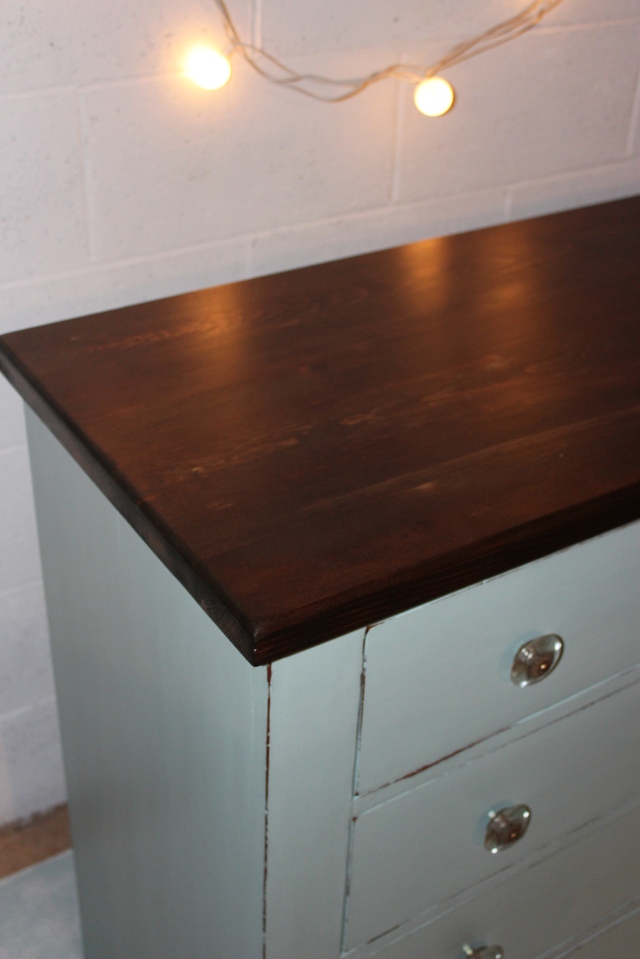
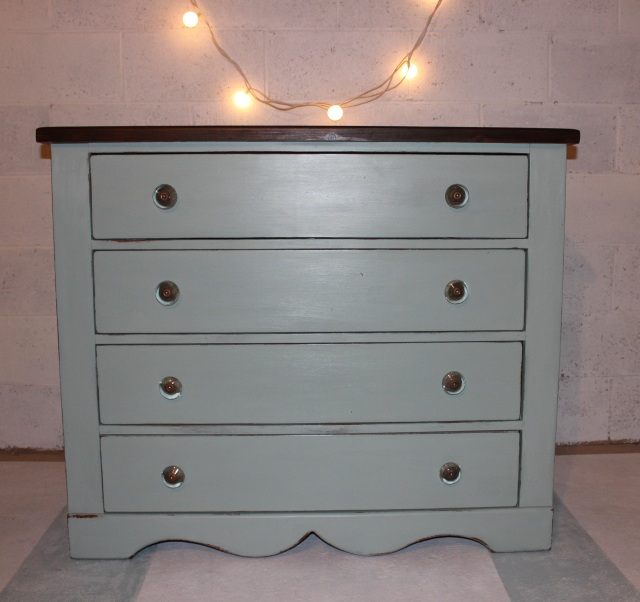
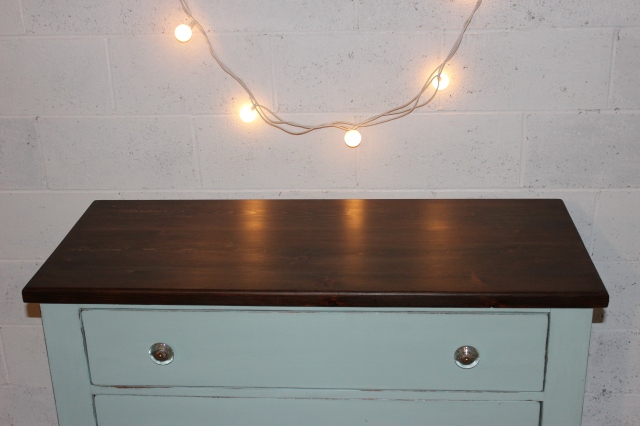
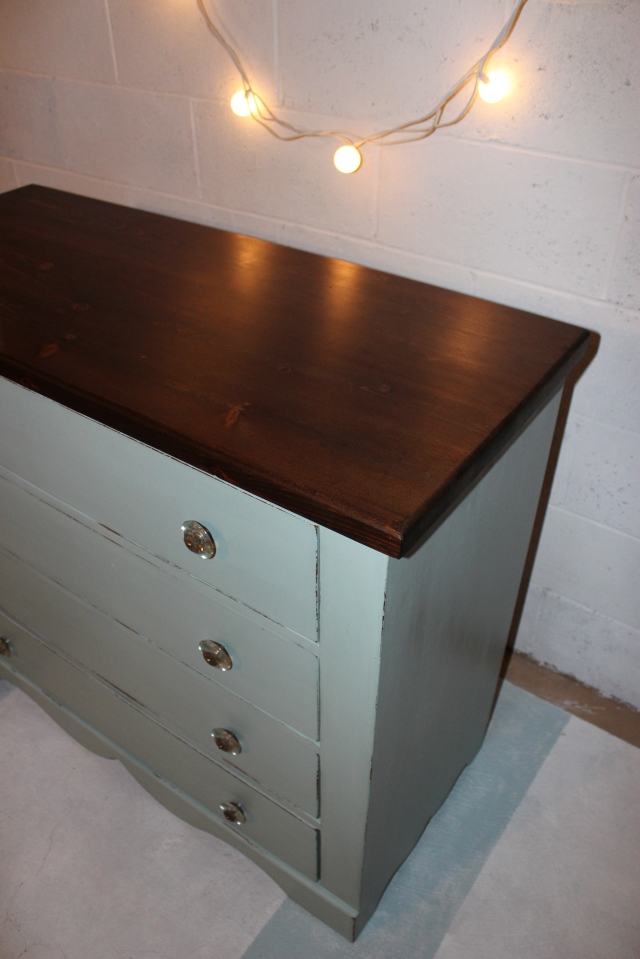
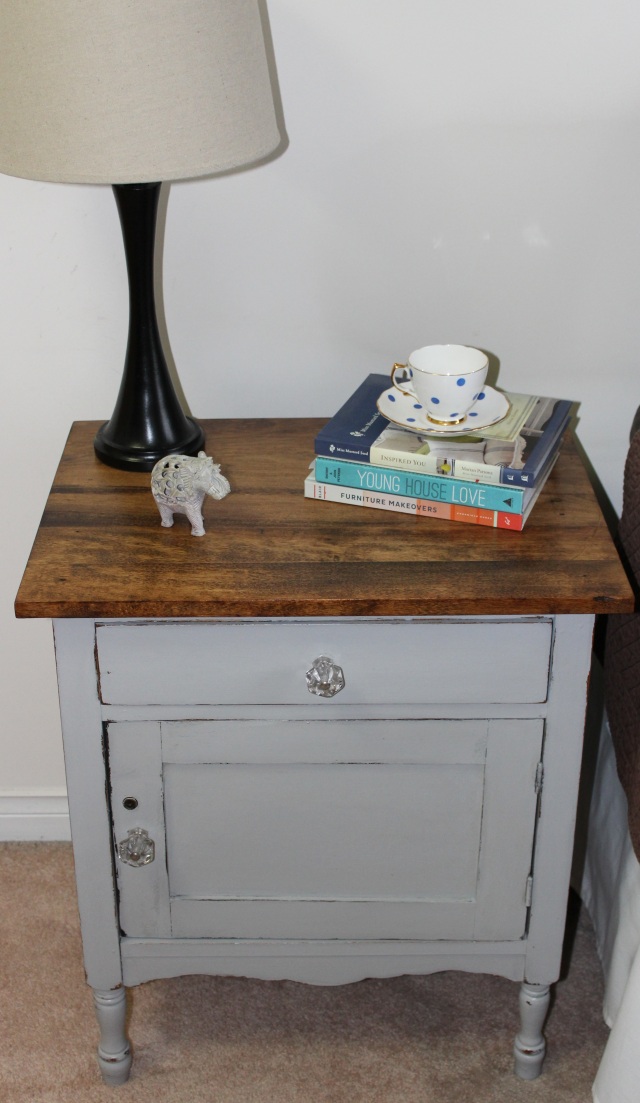
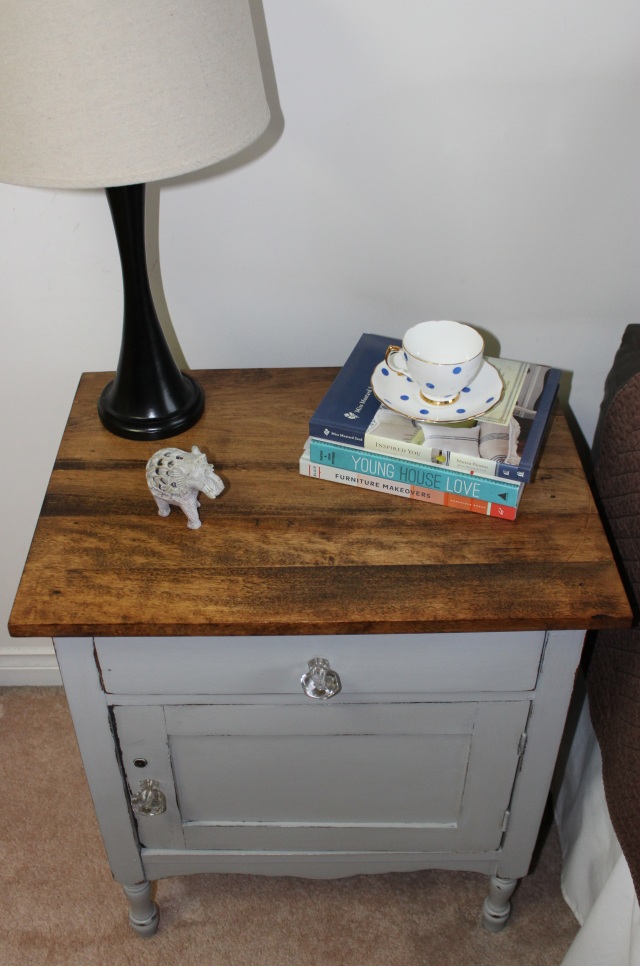
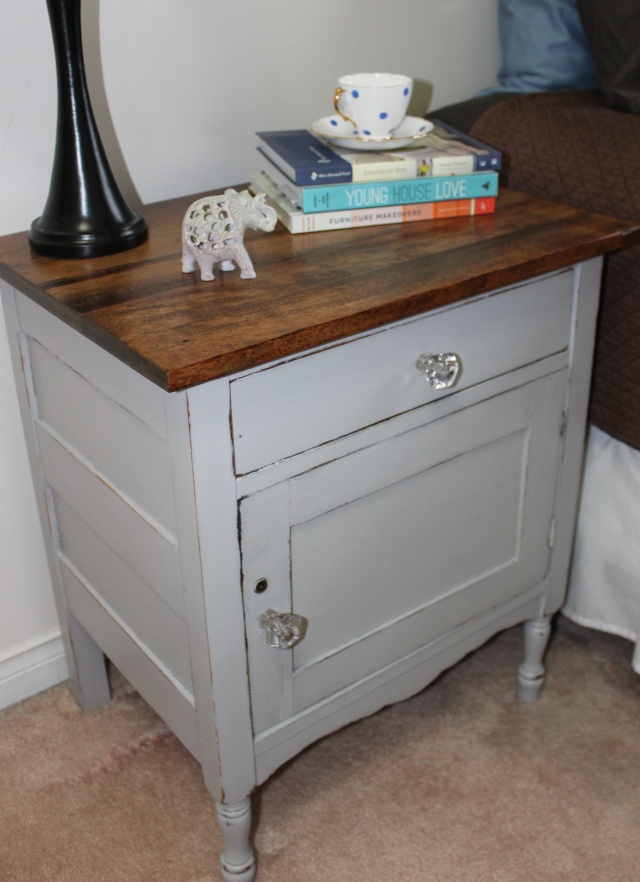
Before, the old finish was blotchy.  I lucked out, the wood grain underneath was beautiful.  I wanted to show it off.    These days, I love using a mid-tone stain colour, so I chose Minwax Provincial.  Something like dark walnut or expresso would be too dark on this piece and hide the grain.

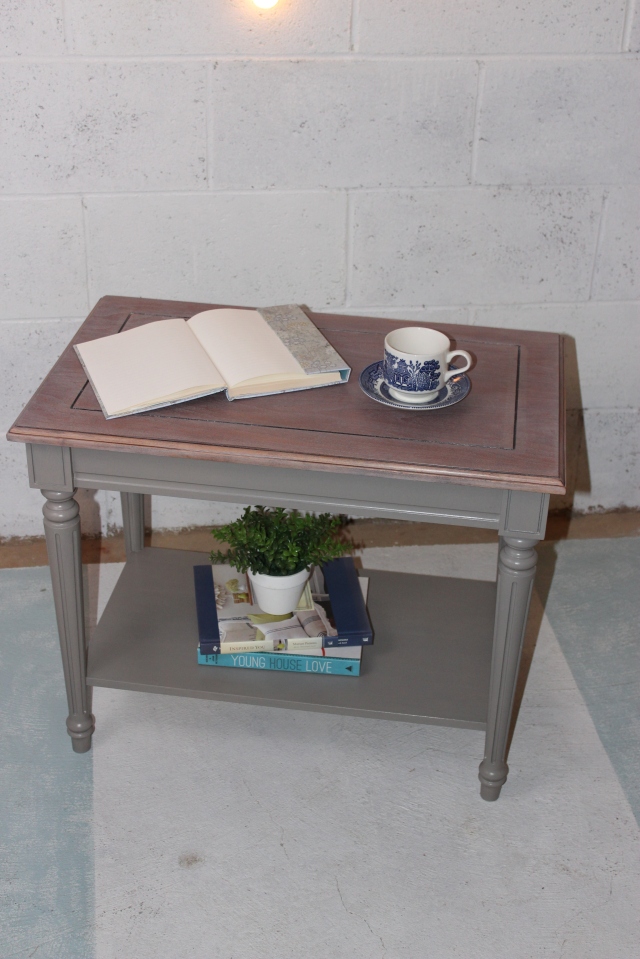
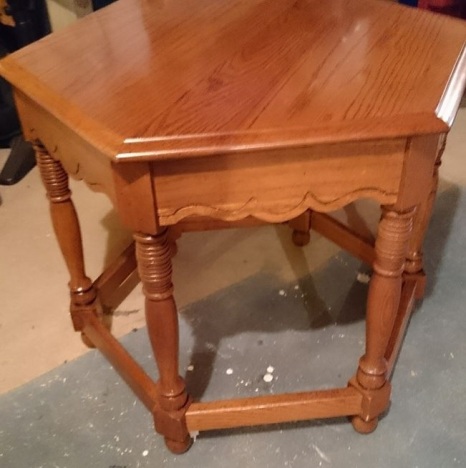
Here’s a reminder of the before…
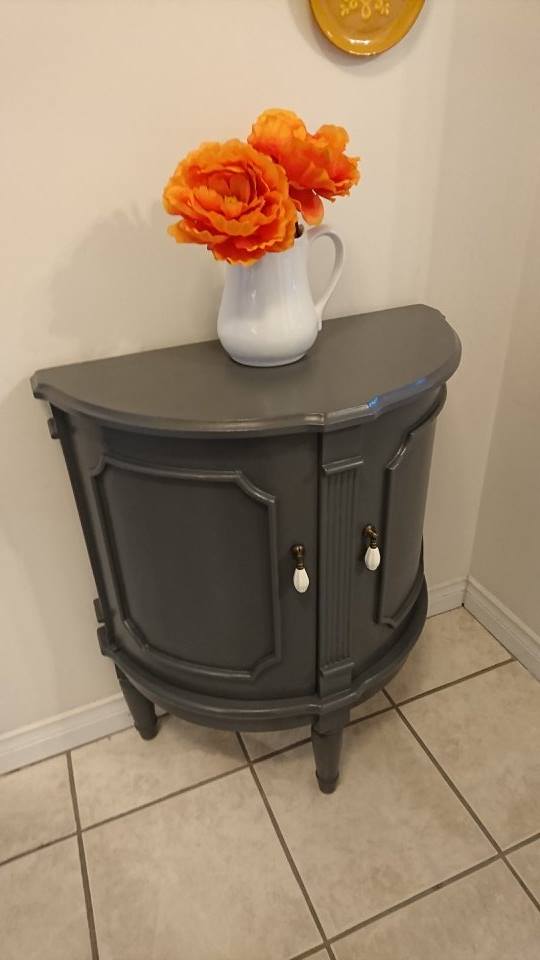
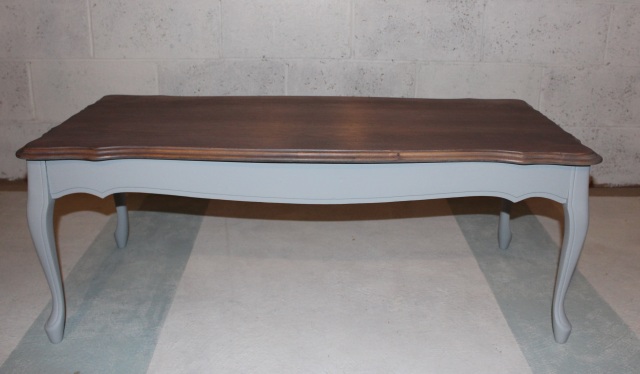
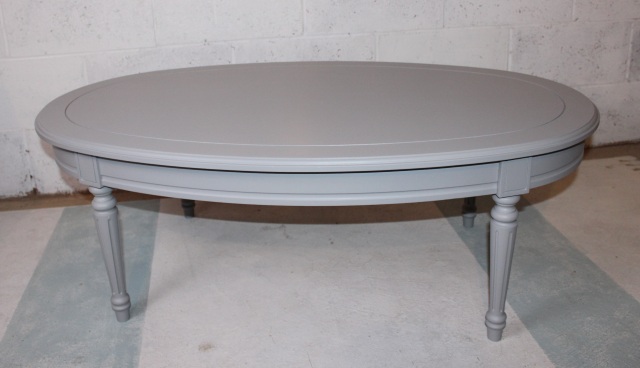
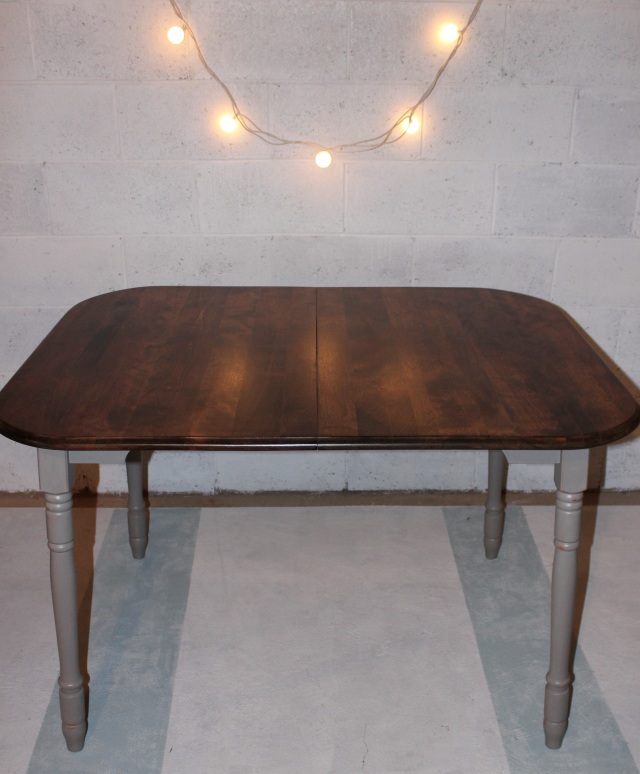
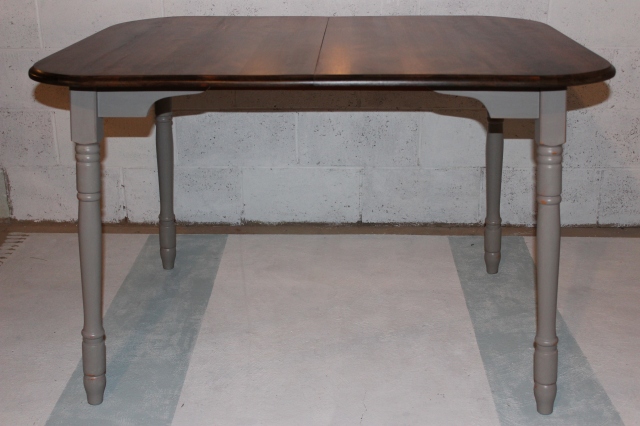
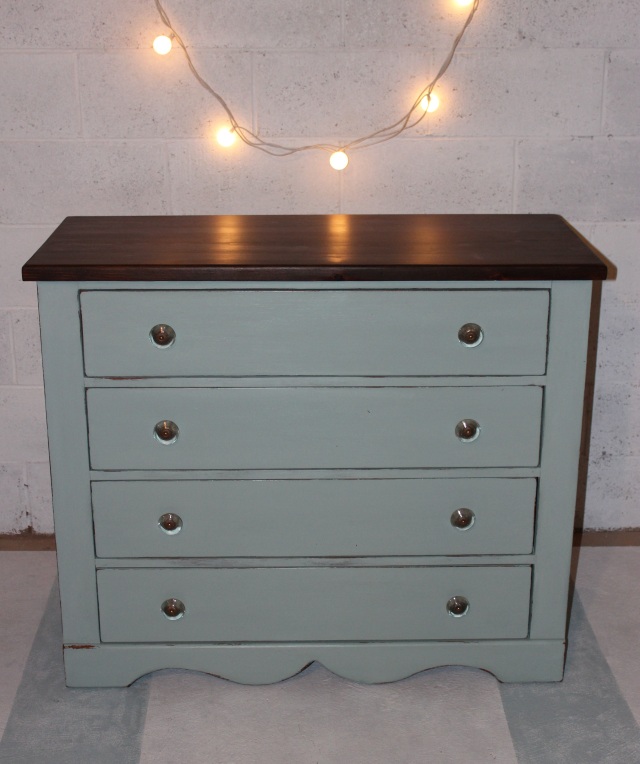
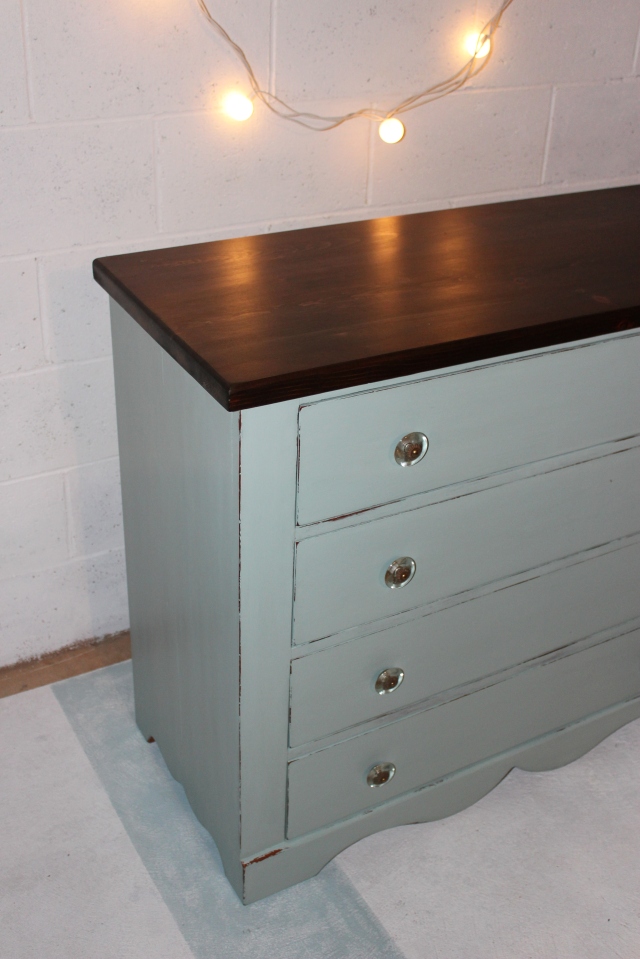
image

And now….

image

It looks more yellowish in this picture,  the top is more of a warm brown.

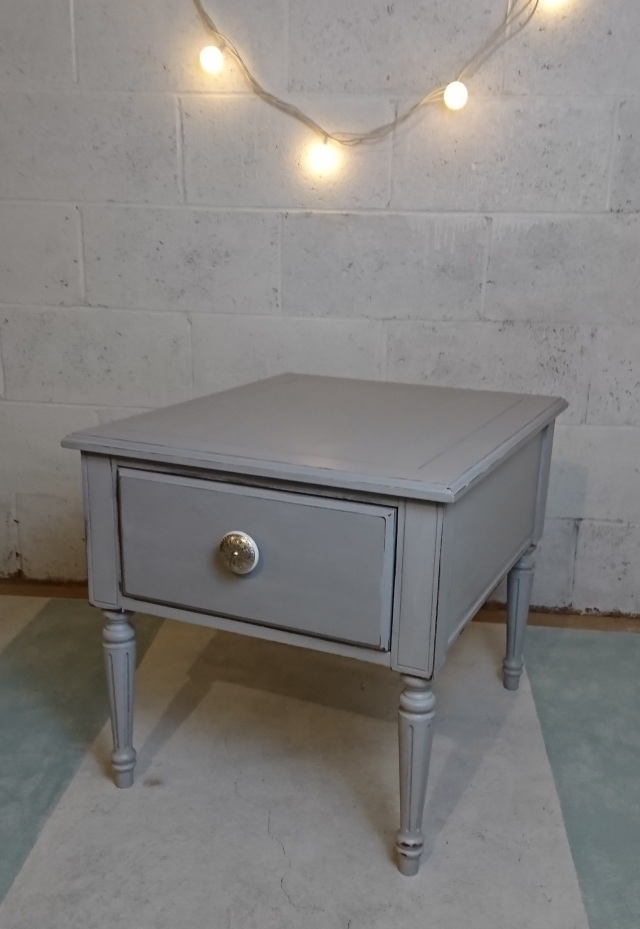
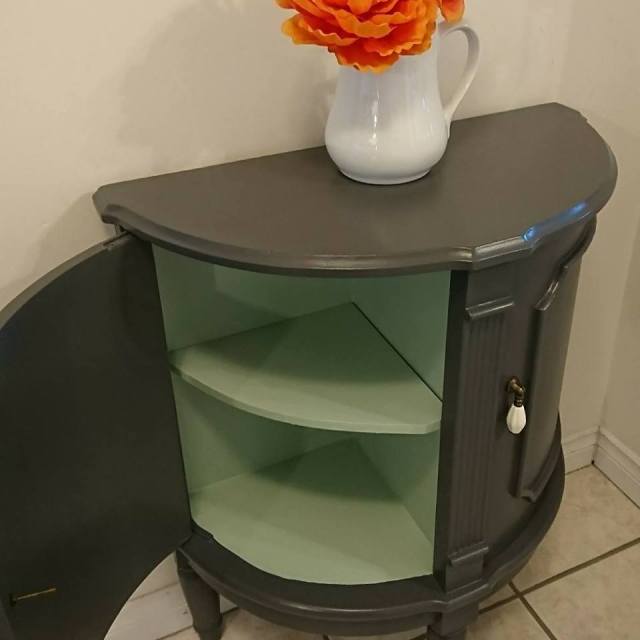
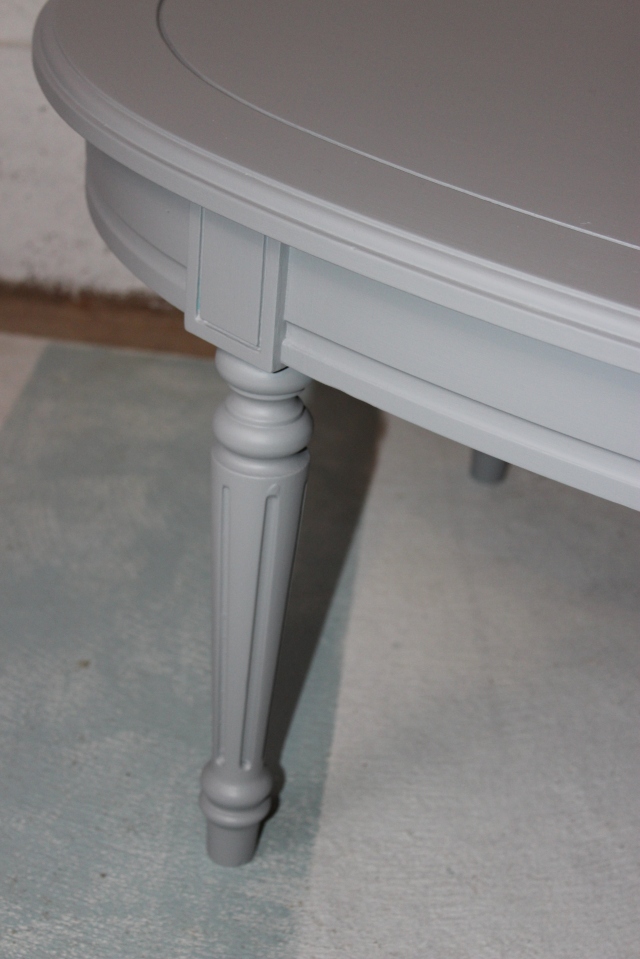
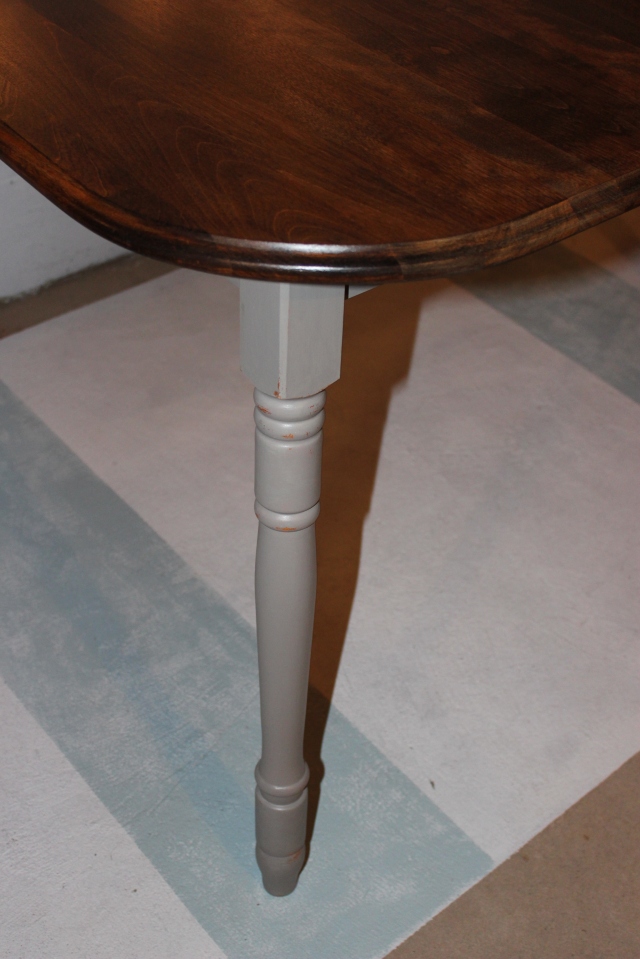
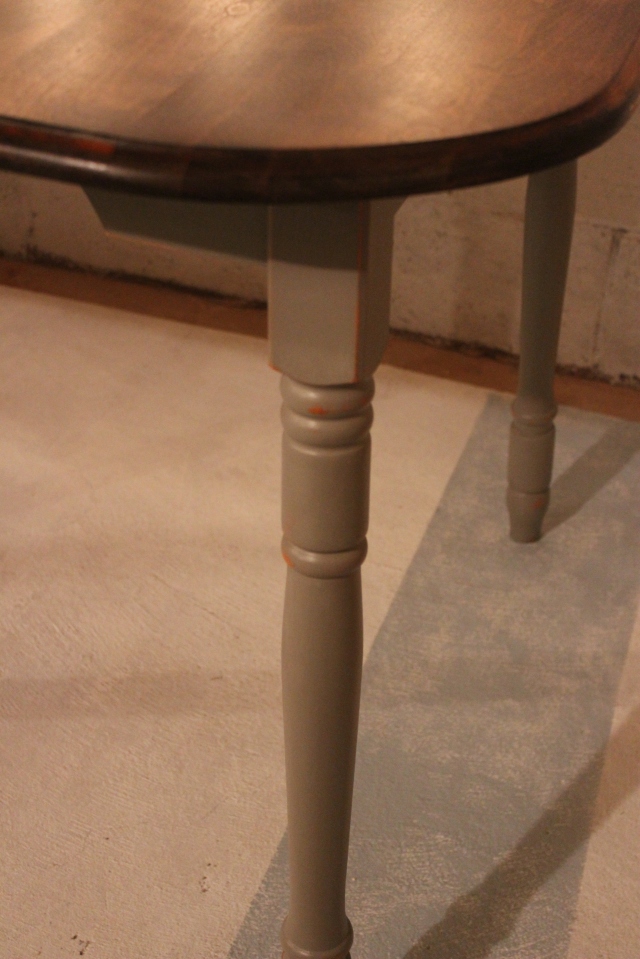
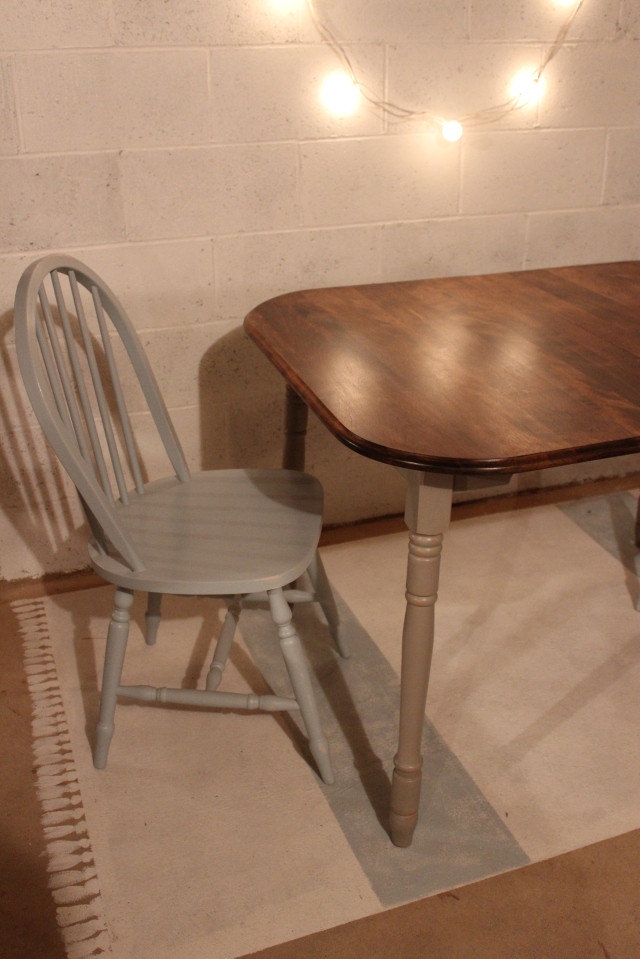
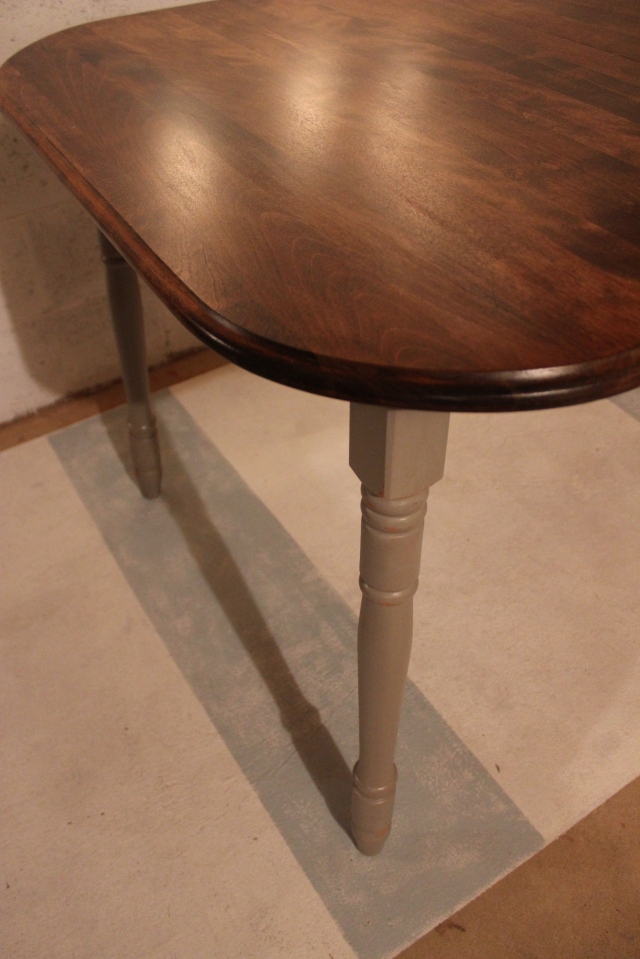
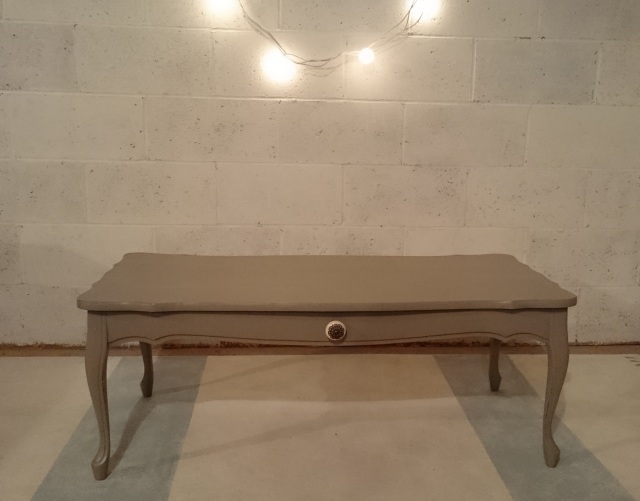
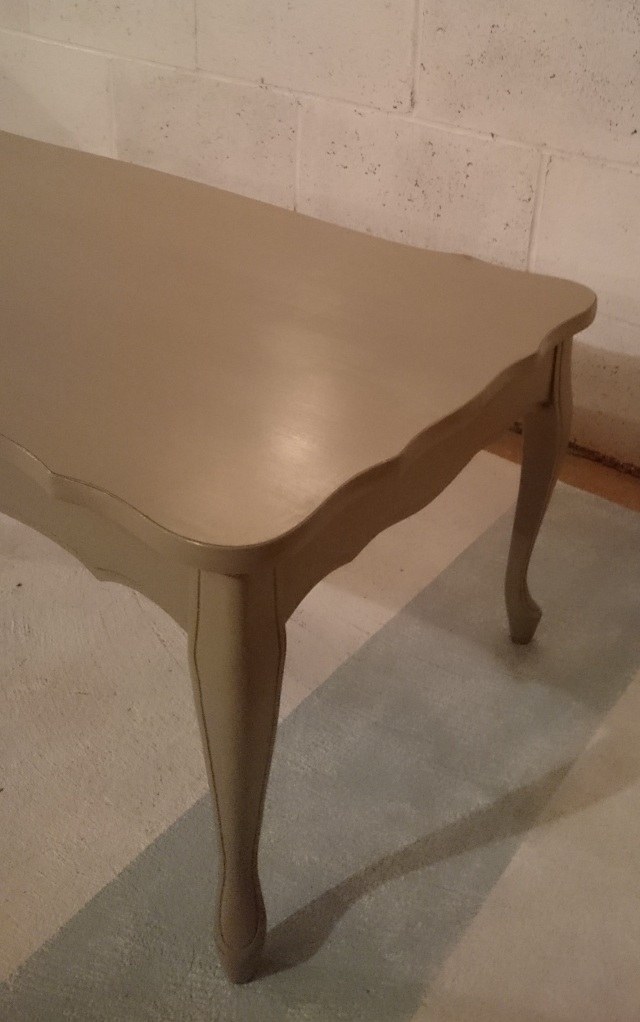
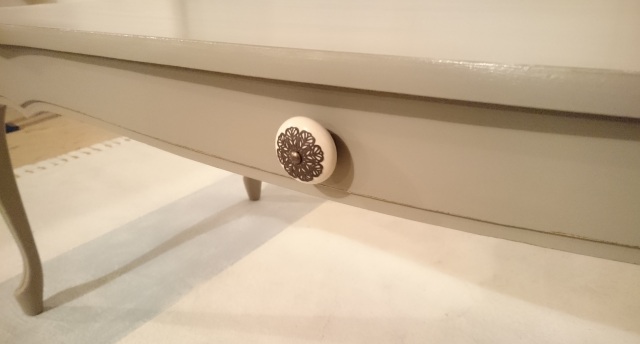
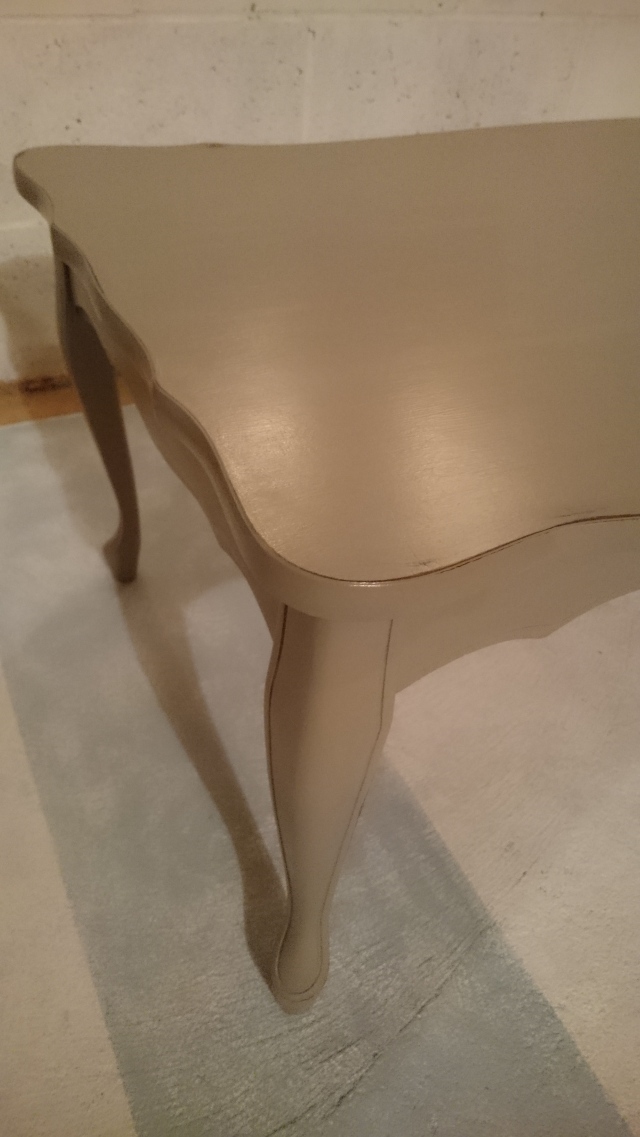
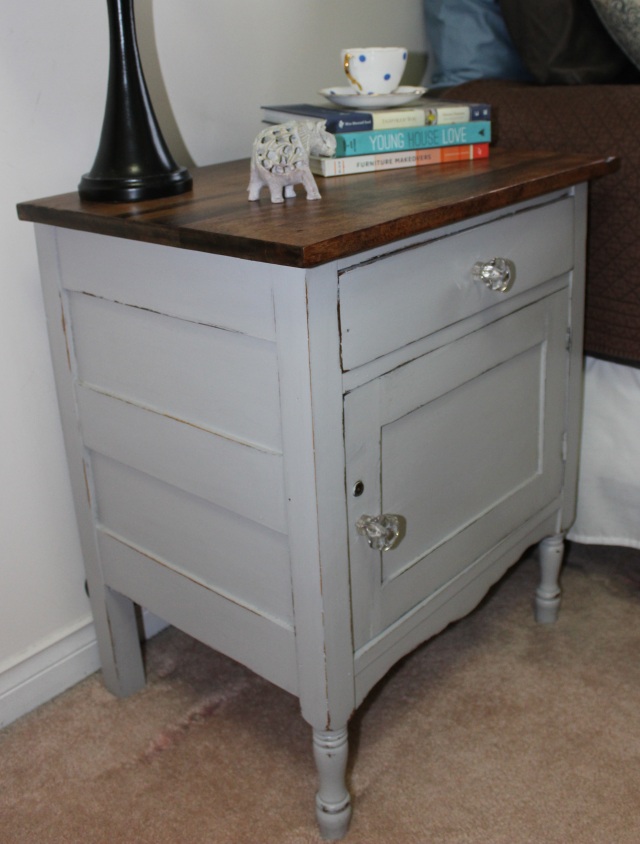
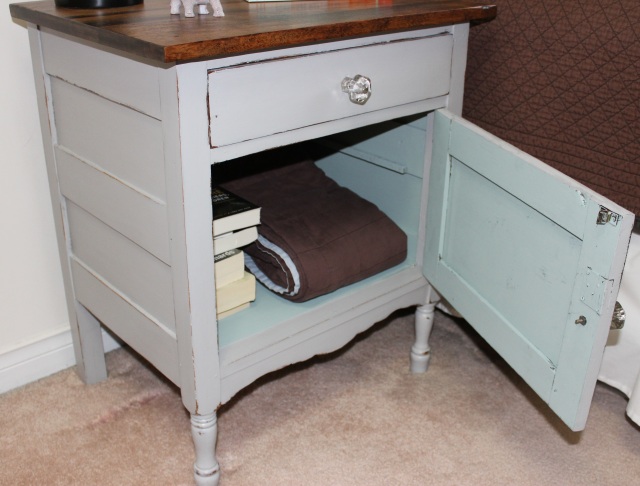
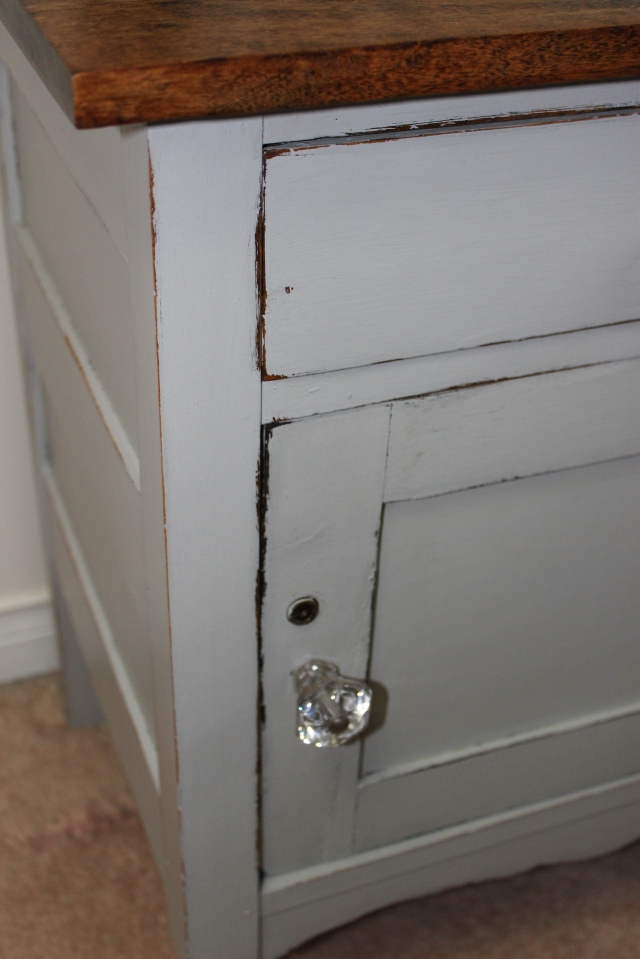
I chose to do the base with my favourite ASCP colour,  Paris Grey on the outside and Duck Egg Blue for the inside.  I did little distressing around the edges and corners.   When painting with ASCP, I like to use a green scrubby sponge for wet distressing.  It doesn’t make a mess and it’s a quick way to get the job done.   I finished up with satin Varathane, hung the door and added two new knobs.  And the beauty is done!

I love how it looks.

IMG_0813IMG_0809IMG_0795IMG_0791IMG_0803IMG_0790

It’s always fun hunting for a special piece of furniture.   Since the commode is finished and sitting pretty in my room, I must go watch hockey!  Playoffs started this week and my team is playing tonight.  Oh my nerves!  I should go pour myself some wine. 😉

Thanks for stopping by!  I’ll be back next week with some more makeovers!

Go Caps go,

Laurena 🙂

And another table done!

A few weeks ago, I posted about a bunch of side tables I had finished.  Like I mentioned in the post, I had quite a few chairs AND tables in stock.  I’m still taking a break from chairs….so, this is another post about tables!  Yay! 😉

The coffee table I picked up from my favourite ‘dealer’.  She lives close to me and has quite a few items on Kijiji.  I swear, once I get a larger vehicle, I’m probably going to have a shopping spree at her house.

After using French Linen ASCP on the console table, I had to use the colour again.  The coffee table had potential, with its nice curvy legs and a faux drawer.  The drawer pull needed to be removed and updated.  I had the perfect knob in mind that would go well with French Linen.  After painting and a little antiquing, I sealed it with dark and clear wax.

Here’s the before and after!

Probably everyone had similar pieces of furniture growing up in the ’80’s.  The look is very dated…but has so much potential!!

DSC_0618

Here’s the after, sweet in warm grey and a new cute knob.

DSC_0749

DSC_0751

DSC_0753

DSC_0758

Love how the table turned out.  Looks much more 2015 and less 1980.  I’d love to find more of this type of furniture.  They’re sturdy and just need a little paint to make it new again!

Thanks for stopping by!

Laurena

Side tables galore.

Over the past couple of years, I’ve collected furniture that I plan on refinishing and sell.  Or sometimes keep ;).  I have quite a few chairs and side tables in stock.  Recently, I had finished a few chairs and dressers.  Both are time consuming jobs.  I needed a break and moved on to some easy projects, the many side tables.  In a couple of weeks, I finished two matching tables, a small side table, a Moroccan style table, and an oval console table.  All purchased for less than $100!  Love that.

My friend gave me these two matching side tables.  They were great tables!  Except they needed a little wood filler where a dog decided to have a snack.  You can see the bottom shelf had a few spots to fill.   The shape of the tables were great, clean and simple.  I loved using Fusion Mineral Paint in Ash on my coffee table and wanted to use the colour again.  The tables were perfect for Ash. Here’s the before…

 Side tables before

….and after!two grey tables after @Pivot~Paint~Create

During the summer I scored a few items from a guy on Kijiji.  One was this bench.  I also picked up this small table.  It was cute and only needed a little bit of work.  It was scratched up and missing pieces of veneer.  A coat of paint would make it new again.  I filled the gaps with wood filler and painted the table in Paris Grey ASCP.  A couple coats of Varathane satin finish and she was done!

 small table before

small table in Paris Grey @Pivot~Paint~Create

I picked up this table a long time ago…and delayed working on it for some reason.  I had a plan.  Paint it teal, distress it and it’d be cute!  Finally I got my paint brush going and painted it in Renfrew Blue Fusion Mineral paint.  There were so many nooks and crannies in this table.  I think that’s why I was slow to work on it!  Tedious to paint but the details are my favorite parts of the table.  I distressed the edges to accentuate their shape.  I love how this one turned out.  Here’s the before, cute but the features weren’t highlighted.

moroccan table

And the after….

moroccan table after @Pivot~Paint~Create moroccan table after @Pivot~Paint~Create moroccan table after @Pivot~Paint~Create

I saved my favourite redo for last…

I bought this console table this summer.  I loved the legs and shape of the table.  It is much bigger than it appears.  It was a struggle to get it in my Toyota Corolla.  Luckily the lovely lady who sold it to me, was patient and helped me get it in my car.

Sidenote: I cannot wait for the day I have a hatchback car.  I dream of all the furniture I can stuff into it.  Desks, large chairs and dressers, oh my!

Ahem, back to the table. I sanded the top down, stained it Dark Walnut and painted the base French Linen ASCP.  I love this colour.  A beautiful neutral, warm grey.  It looks great with the dark top.  Here’s the before and after!!

console table before console table before console table beforeconsole table in French linen console table in French linen console table in French linen console table in French linen

Isn’t that colour gorgeous!?  I love how the wood top turned out.  I had my doubts when looking at the old finish.  But the grain of the wood is beautiful.  Can’t wait to do this colour combo again, it’s one of my favourites.

I have a couple more tables on the go…and then I’ll be working on another dresser.  I’m loving the roll I’m on for getting furniture done!  Hopefully the painting bug continues as I have lots in stock!

Thanks for stopping in!

Laurena

Paris Grey dresser

Another dresser redo!  I love refinishing dressers.  Simple changes to a good quality dresser, like paint or new hardware, can add years to its use. This dresser had great character, but needed a fresh coat of paint and new knobs.

As usual I changed my mind on what to do with the dresser. I had planned on painting it in Paloma ASCP, but went with Paris Grey instead. I also changed my mind on the knobs. I had painted over the old pulls, bit didn’t like how they turned out. So luckily I had a few crystal knobs…they looked perfect!

Here’s the before…
image

And the after!

image
image

image

image

 I love how the crystal knobs updated the dresser and give it a classic, sweet look.  Now to get to work on the last dresser in stock!!  And work on lots of small projects.

Busy life of a furniture re-finisher!

Til next time!

Laurena


Sharing @

Before and After Post Button